It’s confusing when we should use useMemo and when we shouldn’t.
useMemo isn’t free $
useMemo comes with a small cost. So we should understand when it’s a benefit, and when it doesn’t provide any value.
Small usage in RAM to memoize & remember the resulting value
It costs a small cpu cycle to loop over & compare the dependency array & run internal fn of useMemo
So we should be smart when we use it.
useMemo isn’t always needed
useMemo isn’t needed in certain cases. For example, casting something to Boolean, or doing simple math isn’t an expensive operation and returns a primitive like “boolean” or “number”. These value will always be the same every time they are re-render run
true === true and 5 === 5.
Conversely, an array or object don’t have equality,
[] !== [] and {} !== {} and new Date !== new Date.
Two tests of if you need useMemo
Is the calculation to get the value is complex (looping, calculating, initializing a class)?
Or is it cheap (comparisons of numbers, boolean, casting types, simple math)
Is the returning complex value (object, array, fn, or class)?
Or is it a primitive value that is simple to compare (number, boolean, string, null, undefined)
Examples
const date = useMemo(() => Date.parse(isoDateString), [isoDateString]);
I’m so glad you asked! The principles are similar. In general, all callback functions should be memoized via useCallback. Functions are considered a non-primitive value thus never have equality unless we memoize them via useCallback.
As a rule of thumb: Naming booleans in the affirmative
One of the most challenging aspects of software development is choosing the good names for variables. This is particularly true when it comes to Boolean variables.
“Naming things is hard.”
– Some Software Developer
Affirmative names are those that start with words like is, has, or can which clearly indicate that the variable is a Boolean.
Affermative Booleans Variables
Our goal is to be consistent in the naming & to keep it readable — almost like a sentence. Take a look at these examples, “Is logged in” or “has favorites” and “has no favorites”.
Affermative
Negative
isLoggedIn
!isLoggedIn
isEmpty
!isEmpty
hasFavorites
!hasFavorites
canEdit
!canEdit
Great Boolean Variable Names
Reading these like a sentence is natural. “Is logged in” or “can not edit”. There is only one nation flip in your mind you must do when reading the negative cases.
Negative Booleans Variables
Now, let’s consider what happens when we deviate from the Affirmative Approach and use negative names.
Affermative?
Negative?
notLoggedIn
!notLoggedIn
isNotEmpty
!isNotEmpty
hasNoFavorites
!hasNoFavorites
canNotEdit
!canNotEdit
Confusing Boolean Variable Names
Our negative cases create a double negative! 😯
Try to read that negative statement as a sentence. “Does not have no favorites?” I think I know what that means, but that feels like an awkward way of saying “hasFavorites”.
The problem with negative named booleans is that they introduce the potential for double negatives. The Affirmative Booleans approach is more straightforward to mentally parse.
Conclusion
In general, naming Booleans in the affirmative is a practice that can significantly improve code understandability and maintainability.
Avoid no, and not, and other words that create the possible of a double negative when the boolean is flipped.
Naming things is hard, but naming boolean variables in the affirmative is a simple, yet effective way to help improve your code readability. Your future self and your teammates will thank you for it.
If you like thinking about naming, you may also enjoy thinking about pagination naming.
There is an eslint plugin rule eslint-plugin-strict-null-checks but it appears to provide false positives and doesn’t cover all strictNullCheck issues.
ChatGPT and some other generally wants you to manually fixing issues one module at a time, committing, enabling/disabling the strictNullChecks flag along the way.
I believe there is another incremental way
Let’s use this code as our example. With strictNullChecks : false it will not errors. With it strictNullChecks: true it will.
type User {
  email?: string
}

function getUserEmail(user: User): string {
  return user.email; // user.email might be null or undefined
}
Simple enough to fix. But in a large codebase we may have hundreds of these errors, and many will be much more complex. In my teams codebase, we had north of 500 errors and the count was unintentionally increasing.
Two Goals:
How might we incrementally resolve existing issue?
How might we prevent additional issues creeping in?
Enable strictNullChecks → Mark errors with @ts-expect-error → Setup eslint rule → Monitor with esplint
1. Enable strictNullChecks
Enable strictNullChecks is the natural first step in migrating. Adjust the compilerOptions flag for strictNullChecks in your tsconfig.json.
By setting strictNullChecks to true, the TypeScript compiler will perform stricter checks on nullable values, reducing the possibility of null or undefined-related runtime errors.
2. Mark all existing errors with @ts-expect-error
There were likely be a large number of strictNullChecks exceptions in an existing codebase. Realistically, we probably can’t fix them all right away. We can use typescript’s @ts-expect-error comments before every instance of an error to temporarily suppress strictNullChecks errors per line.
function getUserEmail(user: User): string {
  // @ts-expect-error: 🐛 There is a null/undefined issue here which could cause bugs! Please fix me.
  return user.email;
}
This tells the typescript compiler that we’re aware of the error and currently expect it. We are marking them for further consideration during the migration process.
As an aside: @ts-expect-error is generally preferred over @ts-ignore.@ts-expect-error - Is temporary. Once the issue is fixed, typescript will remind us we can remove the @ts-expect-error.
@ts-ignore - Is more permanent. suppresses the error and doesn't expect it to be fixed later.
At this point you could finish here!
However I recommend leveraging eslint to also keep us accountable.
3. Using eslint to highlight lines needing a refactor
While @ts-expect-error comments provide a temporary workaround, it’s important to gradually eliminate their usage to achieve the full benefits of strictNullChecks. Relying on @ts-expect-error extensively can undermine the benefits of type safety. We should flag these as not-ok in our code base. I would like to have a red or yellow squiggle marking them.
With eslint we can configured the @typescript-eslint/ban-ts-commentto warn on the usage of an @ts-comment. This further makes it clear in our editors that @ts-expect-error is temporary and should be fixed.
To take the enforcement of code quality a step further, we can introduce esplint—a tool that specializes in tracking and managing eslint warnings counts and enforcing that the count should only decrease. By leveraging esplint, we can keep a count of @ts-expect-error occurrences in our codebase. This count also serves as a metric to gauge progress during the migration. The goal is to steadily reduce the count, indicating a decreasing reliance on @ts-expect-error comments – thus an increase of strictNullChecks and an overall improvement in code quality.
Migrating a codebase to enable strictNullChecks
From here the codebase is ready to be slowly refactored. We encourage our team as they are working on a stories that touche code near one of these error, to take the time to refactor and cleanup the null checking.
Migrating a codebase to enable strictNullChecks can significantly improve code quality and enhance overall code quality. I believe by following the this pattern is a pragmatic and straightforward approach to enabling strictNullChecks. With diligent effort, we can all embrace strictNullChecks and enjoy the benefits of reduced runtime errors and write more code with confidence.
Thanks to Runbgmn for the original instructions on batch conversion of svg to pdf. The instructions there are currently out of date, so here are an updated set of steps I found to batch converting svg to pdf with Inkscape.
Batch conversion of svg to pdf is very helpful. This is how it can be done under Mac OSX for free, no need to buy any software nor upload anything.
The Setup for Batch Conversion of SVG to PDF
Get the free vector graphics program Inkscape and install it
We’ll want to make inkscape available as a command in our terminal path. To do so, In a terminal execute create a link:
3. Create a new file svg2pdf.sh with the following contents:
#!/bin/bash

# get path from command line
MYWD=$1

for file in *.svg
do
  echo $file $MYWD
  cat "$file" | inkscape --pipe --export-filename="${file%%.*}.pdf"
done
5. Make it executable:
chmod +x svg2pdf.sh
Usage
Run the script with the path to the folder filled with *.svg files to be batch converted to *.pdf.
Example:
bash svg2pdf.sh ~/Documents/folderOfSVGsToConvert
This will convert all svg files in the given directory into pdf.
Next you can use Adobe Acrobat, Preview, ghost script or many other programs to combine them into one single pdf file instead of multiple pdf files.
Combining Multiple PDFs into a Single PDF
Combining with Preview
The simplest way to combine multiple PDF files into a single one on Mac OSX is to using Preview.
Open the first page with Preview.
Open thumbnails pane in the menu View → Thumbnails
Drag and drop each PDF file into the thumbnail pane in the page order you’d like.
Combining with pdfunite
Install poppler, a PDF manipulation toolset.
brew install poppler
You’ll now have pdfunite command available, run it on your directory of PDFs to create a single PDF.
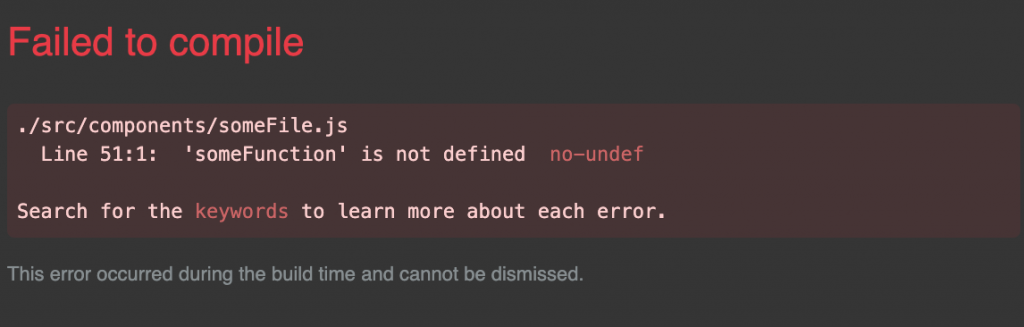
When an error occurs with an app Created with Create React App the error screen is super helpful.
You can click on this error in the browser to jump directly to the line of code inside your editor! But how do you setup VSCode with REACT_EDITOR?
Console error:
Could not open SomeFile.js in the editor. To set up the editor integration, add something like REACT_EDITOR=atom to the .env.local file in your project folder and restart the development server. Learn more: https://goo.gl/MMTaZt
Setup your editor to be open from terminal
Google “How to open [your editor] from terminal” to find instructions for your editor.
For VSCode, open the command pallet ( Command Key + P ) and type > shell to install “code” into your PATH environment variables.
You should now be able to open terminal and type code to open VSCode. Pretty nifty!
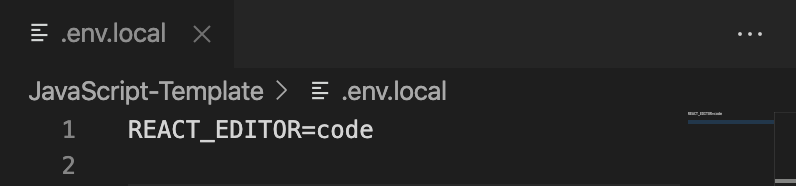
Setup your React Project to know which editor to open
Create a new file (or edit the existing) .env.local file.
setup VSCode with REACT_EDITOR this will be REACT_EDITOR=code and for other editors set it to the command you found to open your editor from the terminal.
Planning quarter roadmap and which projects to tackle is daunting.
It’s a lot to think about: What’s most important, What are quick wins, What work needs to be finished, Which stakeholders are most important.
Time to build matters
It’s easy to overlook the size of projects and how long they will take: Requirements are vague, Designs don’t exist, Dependencies are unknown — Everything is guess work.
Including the Team to Discover Scope
It’s tempting to hold tightly what projects are being dreamed of, holding them close until the start of the next quarter — revealing them at a kick off. Keeping the roadmap a secret is dangerous.
Two things this can cause:
Surprising the teams that will be building the projects, they have many questions.
The time and effort wasn’t decided by the team that will be building the projects, it was likely assumed.
Therefore it’s important to pull in the team to help build out the next Quarters roadmap. It should be clear they likely won’t be making decisions of what gets prioritized. Leveraging the teams to understand the systems that are in place, project managers can work with the team to understand guesstimate time range or amount of effort it might take to accomplish the possible projects project.
Better estimates of projects scopes that can inform prioritization.
Team is excited for & already understands projects that are in the pipeline
Temptations & Warnings planning quarter roadmap
It can be tempting for a team to dive into the technical implementation of a project. This is ok up to a point, but only to a hypothetical point. The goal is to create a rough range how long it might take.
Time ranges are important. There are always surprises, both good and bad that cause projects to go faster, but typically longer than expected.
When estimating, pick a unit for the time. Let’s say a project may take 2-3 weeks – but is that with 1 person? Or a full 3 person team working on it? It makes a huge difference! When pick units, Stay consistent with those units.
An extended form of hiking in which people carry double the amount of gear they need for half the distance they planned to go in twice the time it should take.
~Author unknown
It’s very tempting to take the low estimate. Don’t use the lower estimate! Projects always tend to run longer for miscellaneous reasons (bugs, scope creep, interruptions, pto, forgotten pieces, testing). It’s much more realistic to pick something in the middle or even the pessimistic estimation. I wrote about a related topic, Why We Estimate Stories which goes further into the cautions of under estimating.
Visualizing the Estimates
I’ve built a spreadsheet layout for looking at projects that have been picked for the roadmap and how they look on a time line.
Again it’s tempting to only look at the Optimistic estimate, and it might be best to delete the Optimistic row if temped by it.
On my teams it’s very important that the entire team focuses and works on only one project at a time (else you really have 2 teams not 1 and projects take longer, gasp!). We also estimated our projects in units of “number of weeks 2 devs working” for each project which makes it super convenient to map out.
Looking at this we can see a lot of great info. For example, we can see something interesting about Project B. It’s 4-7 weeks, the team isn’t very confident in it’s scope & needs. We either need to better define the scope, cut scope, or table it until we better understand it. It puts other smaller projects at risk. Perhaps Project D is high priority to complete in Q4. There are many great conversations we can now have.
Setting Good Commitments & Expectations
There were actually Projects A – J slotted for Q4. That’s 10 projects. Working with the team, even the optimistic projection puts us at the end of Q1, and pragmatically 1/2 into Q2!
If we hadn’t worked with the team to estimate the scope we would have been blind to our commitments we almost made in Q4. While we were excited with hope about all the things we would to accomplish in Q4 we would have been setting ourselves up for failure & disappointment & poor morale. Not only within our team, but also our external stakeholders.
Conclusion
Being pragmatic about commitments planning quarter roadmap is hard but hugely important in setting a team up for success. We are inherently optimistic creatures, we want to promise & hope to accomplish more than is realistically always possible.
Finding tools to help us be honest with ourselves makes us & our teams be honest & better people.
There are two reasons we estimate stories: to understand scope and then to communicate that size of that scope to others.
Understanding Scope of Tasks
In order to be effective at anything we do in life, it’s best to step back and understand what it is exactly that we want to accomplish.
How hard is it?
How complex is it?
Are there unknowns?
How long might it take?
How well do we understand it?
Are there other tasks that need to be done first?
As an individual we ponder these questions ourselves. As a team we discuss them together during our weekly scope and grooming to refine our shared understanding.
It’s easy to dismiss small tasks as not worth any further scrutiny because they feel obvious. Asking these questions takes little time. Even the simplest tasks can hold surprises if we take a moment to ask these few simple questions.
A fool does not care whether he understands a thing or not…
– Proverbs
Communicating Effort
It’s hard to express how long or hard a task is to others that are not in our domain of knowledge. Perhaps they’ve never seen what code even looks like, much less tried to program.
Thus we point and estimate stories. I prefer to call them effort points or “oof” points. How much “oof” effort does something take to accomplish.
Here is an example with my household chores.
“oof” effort
Story Points
~Time
Take out trash
Little “oof”
1
1-10 min
Wash the dishes
Small “oof”
3
10-60 min
Mow the lawn
Medium “oof”
5
1-3 hrs
File taxes
Big “oof”
8
3-8 hrs
Remodel bedroom
Large “oof”
13
2-5 days
What’s important to notice is that Story Points / Effort doesn’t mean a specific length of time but rather an estimated time rage.
Story Points are a valuable tool to roughly translate effort → time estimations.
This gives Project Managers a way of estimating a rough expectations of when a collection of tasks might be completed. This empowers Project Managers therefor to set a realistic estimated timelines & expectations with external stakeholders for when tasks and projects might be completed. I wrote more on Planning Roadmaps & Project Estimation in another post.
Personal Cautions & Notes – Estimate Stories
Lean heavily on higher end time values when trying to translate points to time; that is be pragmatic.
It’s highly unrealistic it only takes under 1 min to take out the trash & put a new bag in, probably closer to 8 min.
Project managers don’t mind hearing that something is complex, big or unknown, the sooner they know this the better.
Project Managers love the radical honesty, it helps them set realistic expectations with their stakeholders.
Always round up to higher point levels if something is on the fence.
Talk about estimating with your team and create a good Developer Culture when you estimate stories.
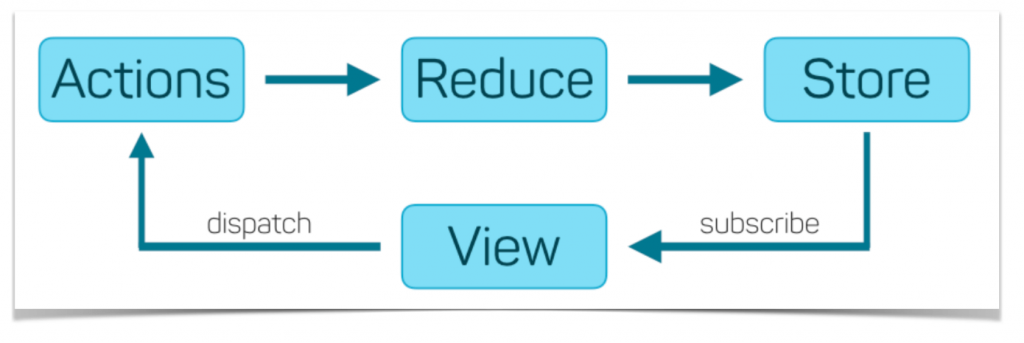
Redux’s ideology is a unidirectional data flow. This pattern reduces long term complexity, encourages re-usability, and generally discourages spaghetti code. 🍝
The core of everything is the Store, Action, and Dispatch. In its simplest form it’s all you technically need. From there Thunks & Sagas enhance the the tooling around the Dispatching of Actions.
Store
A singleton object/state for the app.
Action
A payload describing what data you want to update in the store.
I’m a firm believer in using whatever tool you need to get the job done.
Is there shame in using a GUI?
I’m don’t believe in shaming devs for using a GUI and not using a CLI in the Terminal.
Dev shaming is toxic. It hurts people, and that’s not what we want, we want to build each other up! We want to get excited at each others accomplishments!
The tools we use to accomplish the task don’t really matter, what matters is that we build amazing software. There is no elite-ism of using one tool over another.
“You’re not a real dev if you don’t use a CLI” is a myth. Never believe those words. You’re a real dev if you can write software that works!
Why do I use both?
Personally I really use a mix of GUI and CLI. Some tasks are quick and easy in one or the other for me. For you it might be a different mix of benefits.
I prefer GUI for
Quick glance context: Current branch, commits behind/ahead, conflicts, other branches status, changed file count.
Cherry pick lines to commit, discard lines
Interactive rebasing & squashing with ease
Scrolling through exactly what lines of code I’m committing
Join me for a story about my journey migrating my personal API server to a new host. Never has there been such thriller as this adventure. There are learnings, distraction, stories, and of course a bitter sweet goodbye.
What do I host with my API server?
It’s a Node.JS express server.
Code is a joy of mine. In my spare time I tend spin up side projects and build experiments. Many of these ideas depend on storing & responding with data, thus I wrote a lightweight NodeJS express server to act as my generic multi-tenant api to server all apps I may rapidly prototype.
Some notable projects include:
DancingQuest – Chicagoland & Wisconsin Social Dance Calendar
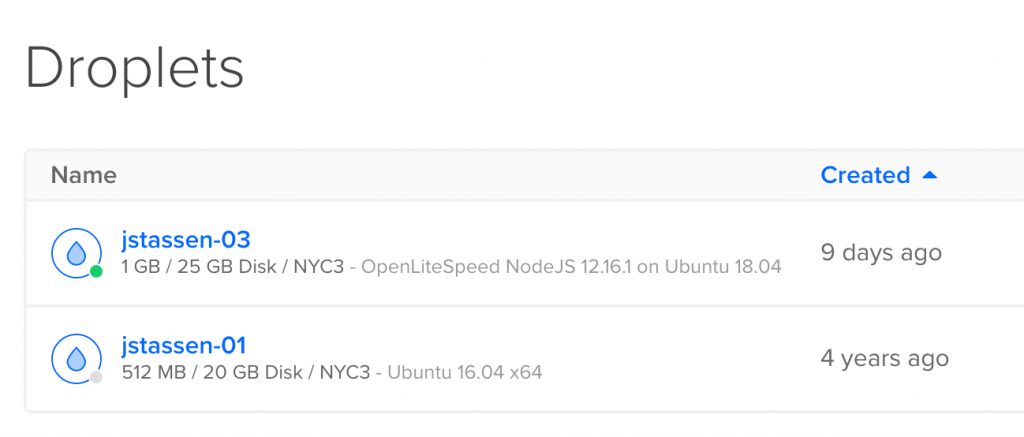
1) I use DigitalOcean as my host. The server cost $5/mo. I created the box 4yrs ago. For new boxes DigitalOcean now offers more RAM & Hard Drive space at the $5 tier.
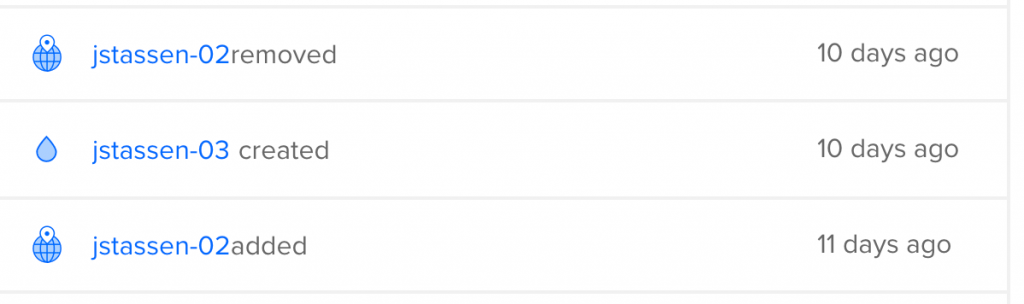
What happened to jstassen-02? RIP
2 ) Ubuntu upgrade form 16.04 to 18.04. I could just upgrade the system, but value in starting fresh right?
3) Ok ok, dpkg is also very broken on jstassen-01, something with the python 3.5 package being in a very bad inconsistent state. I would really like install docker and start running mysql or mongo db. I started to fix dpkg to get this working, but that went down a rabbit hole.
Given these 3 nudges, it just made sense to swap to a new box, install node and call it a day.
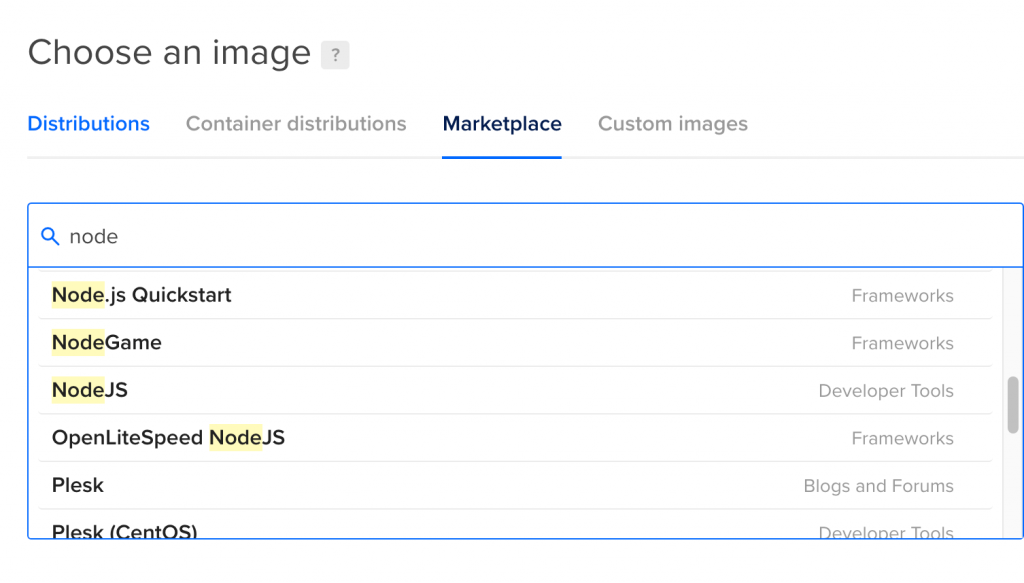
I got distracted at LiteSpeed!
I used DigitialOcean’s pre-configured Node boxes to get me started instead of going from a bare Ubuntu box this time. They have some nice ssh security & software firewalls prebuilt. Wait, but what are these other options?
Ooo what’s this? OpenLiteSpeed NodeJS? Never heard of it, let’s try it out!
After much confusion and configuration (C&C) I had things running pretty well. It required some modifications to the node app. The benefit of running the Reverse Proxy, the box can now listen on port 445 (https) and based off the domain name route to separate apps in the future. Do I need this? Not really, but don’t mind the option.
OpenLiteSpeed Listener configuration & Virtual host mapping page. This will be handy.
Then the code changes started
OpenLiteSpeed integrates & uses Let’s Encrypt out of the box. Previously I had the Node app handling serving up the certs. It’s rather nice to have the Node app be responsible for less. This brings the dev and production app closer together in parody.
The Database files are document based dbs stored to disk in flat files. It was nice to better organize where these were located on my file system. The migration to a docker based mysql or mongo db is a separate project. (whew avoided one distraction)
A new home
Next was updating the url to a more generic one. I previously used https://jstassen-01.jstassen.com. I could simply point that url at the new box. But that’s kinda ugly jstasssen-01 points to a server named jstassen-03 right? Hm. What about create a url like https://api.jstassen.com then it won’t matter what box it points to in the future.
Fun fact, API calls from an app won’t follow 301 redirects. So, redirecting jstassen-01.jstassen.com -> api.jstassen.com won’t work, especially with POST requests. Well Bummer.
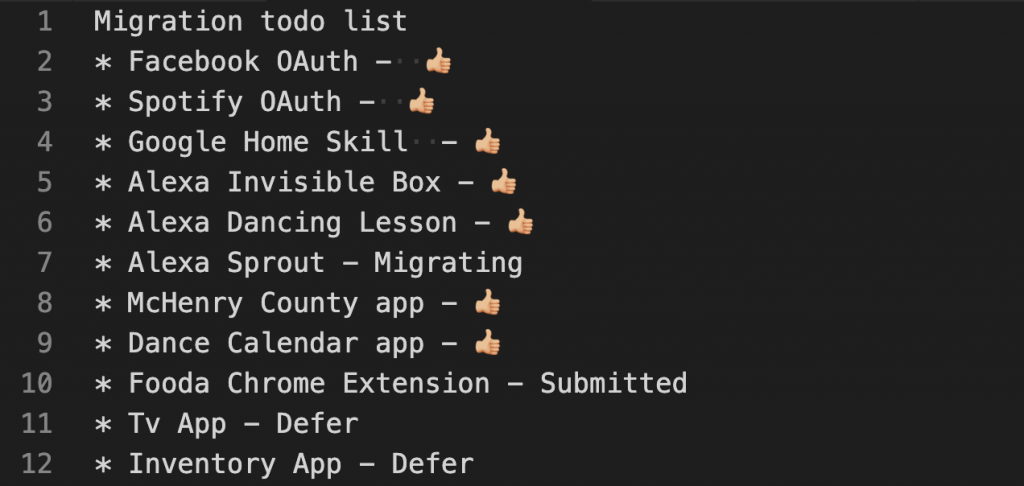
No worries I can update all my apps to use to a new url. No big deal! … oh right that’s 11 different projects. Hm.
Tracking my progress. Emojis always help.
Half were very easy, however I wrote my first google chrome extension and Alexa skill back 4 years ago. I last updated & published them about 1 year ago. A lot of security changes have been updated for how these apps are now built. They have refined their permissions, coding patterns, and apis.Previously grandfathered in as legacy for both, but to redeploy, I needed to upgrade them. Sure, that can’t take long.
Next I noticed OAuth apps were failing. Cookies were failing to be set entirely. Kinda critical piece to remembering which user is authenticated! Interestingly Express.js by default won’t trust credentials forward to it through a reverse proxy (like LiteSpeed). Just needed to allow 1 layer of proxied requests. app.set('trust proxy', 1). Well that one liner took an evening to figure out, haha.
You mean I have to rebuild?
To use use the newest packages, I needed refactor both the google chrome extension and Alexa skills. 1 week later, whew it was complete! On the upside, all my dependencies are fresh and up to date. I now have a modern promise based ajax library and promise based db read / writes. Fancy.
I swear all I wanted to do was copy the code over to a new server and start it up. I didn’t bargain for these code improvements and refactoring.
Performance Testing
Is it faster? I ran 1,000 requests 10 concurrent against a heavy GET endpoint. The new box is on par and just marginally faster ( maybe 1%?) but it’s insignificant difference. Reasure none the less.
RIP jstassen-02, you were taken from us much too soon.
jstassen-02 (RIP) was a failed experiment running Plesk server. It was heavy, a RAM hog and just not optimized. Not to mention Plesk limits your vhosts. Api calls sometimes took twice as long compared to jstassen-01.
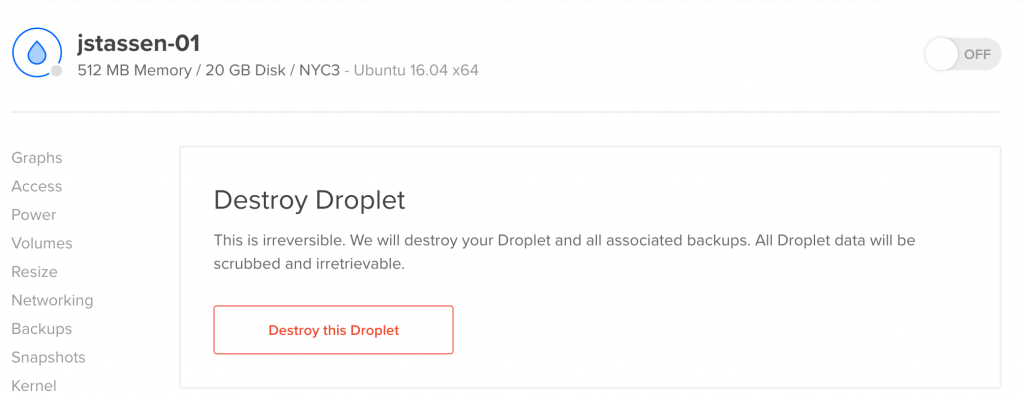
Backing up
It’s time to say farewell and delete jstassen-01. I’m not scared at all, why would I be? And yet I hesitate.
I found this youtube video with a reasonable way to create an archive of the Ubuntu box I can hold on to just in case. Can I restore from it? Hard to say. But at least the data will be there in the off chance I missed something.
# Backup
sudo tar -cvpzf jstassen-01.tar.gz --exclude=/backup/jstassen-01.tar.gz --one-file-system

# Restore
sudo tar -xvpzf /path/to/jstassen-01.tar.gz -C /directory/to/restore/to --numeric-owner
A small 3.24GB archive. I could make the archive smaller by clearing npm/yarn cache folders and clear temp files. But it’s close enough, not too bad.
Maybe next I’ll experiment with creating a new Droplet for a day (a droplet for a day probably cost something like $0.17) and try a restore. Would be interesting to understand this style of backup.
This probably was a bit overkill since I’ve also started to create 1 off private repos on GitHub and use them as a backups as well. So I a committed version my whole home directory too.